Note: This code is using v7.3.1 of the python-qrcode library.
import qrcode
from PIL import Image, ImageDraw
from qrcode.image.styledpil import StyledPilImage
from qrcode.image.styles.moduledrawers import (
    CircleModuleDrawer, SquareModuleDrawer
)
import matplotlib.pyplot as plt
%matplotlib inline
def show_qr(img):
    plt.figure(figsize=(5,5))
    plt.imshow(img)
    plt.axis('off')
    plt.show()
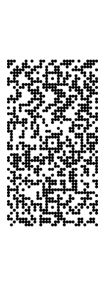
Generate a regular square qr code
This qr code points to stackoverflow with circular points instead of the traditional squares (just for style).
There’s a large ‘border’ (or buffer around the qr code) to give space to create the circle. This will become clearer in a moment.
qr = qrcode.QRCode(
    version=10,  # https://github.com/lincolnloop/python-qrcode/blob/df139670ac44382d4b70820edbe0a9bfda9072aa/qrcode/util.py#L183
    error_correction=qrcode.constants.ERROR_CORRECT_H,
    box_size=10,
    border=18,
    mask_pattern=4,  # https://www.thonky.com/qr-code-tutorial/mask-patterns,
)
qr.add_data('https://stackoverflow.com/')
qr.make(fit=True)

img = qr.make_image(
    fill_color="white",
    back_color=None,
    image_factory=StyledPilImage,
    module_drawer=CircleModuleDrawer(resample_method=None),
    eye_drawer=SquareModuleDrawer(),
)

show_qr(img)
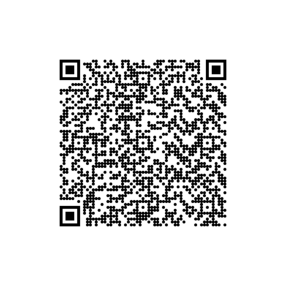
Simple Circle
A ring can be added around the qr code to give it a ‘circular’ appearance
img_copy = img.copy()
draw = ImageDraw.Draw(img_copy)
draw.ellipse(
    (30, 30, img_copy.size[1]-30, img_copy.size[1]-30),
    fill = None,
    outline ='black',
    width=30
)
show_qr(img_copy)
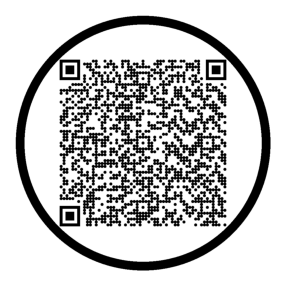
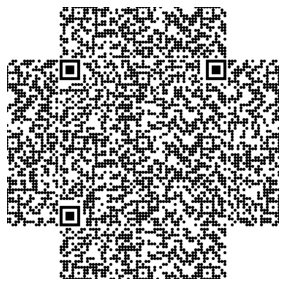
While this can be appealing on its own, the negative space between the qr code and the ring can be filled with a pattern that mimics the qr code to look cohesive
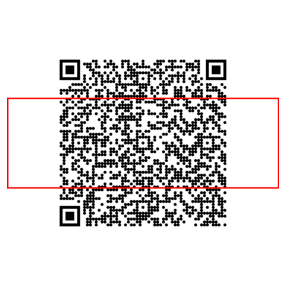
Filling the Negative Space
To fill the negative space, we can steal some of the qr pattern from the center section of the qr code.
The section in the red box is what we can use as a filler.
Note: The image above is a copy for illistration purposes, but the ring will have to be added to the ‘real’ image later as it will have to be drawn on top of everything else.
# get fill texture
width, height = img.size
left = 0
top = height // 3
right = width
bottom = 2 * height//3
This red section is the section we’ll crop and use to fill in the negative space on all sides of the qr code.
img_copy = img.copy()
draw_rec = ImageDraw.Draw(img_copy)
draw_rec.rectangle(
    (left, top, right, bottom),
    fill = None,
    outline ='red',
    width=5
)
show_qr(img_copy)
cropped_section = img.crop((left, top, right, bottom))
show_qr(cropped_section)
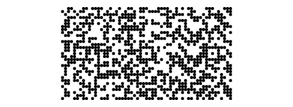
The section can be used in this orientation for the top and bottom negative spaces. But for the left and right spaces, the same section can be used when rotated.
rotated_crop = cropped_section.copy()
rotated_crop = rotated_crop.rotate(90, expand=True)
show_qr(rotated_crop)
With these sections, we can insert and them into the original qr code and slide them around to fill in the negative space on all sides.
# fill top
img.paste(cropped_section, (0, -cropped_section.size[1]//2 + 20 ))
# fill bottom
img.paste(cropped_section, (0, img.size[1] - cropped_section.size[1]//2 -20 ))
# fill left
img.paste(rotated_crop, (-rotated_crop.size[0]//2 + 20, 0))
# fill right
img.paste(rotated_crop, (img.size[0] - rotated_crop.size[0]//2 - 20, 0))

show_qr(img)
Finishing Touches
Now we can add the ring back in.
# draw boundary circle
draw = ImageDraw.Draw(img)
draw.ellipse(
    (30, 30, img.size[1]-30, img.size[1]-30),
    fill = None,
    outline ='black',
    width=30
)

show_qr(img)
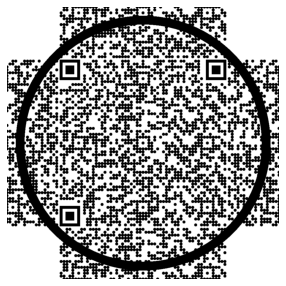
To get rid of the patter that extends passed the ring, we can create a mask.
# draw outside mask ring
draw.ellipse(
    (-rotated_crop.size[0],
     -cropped_section.size[1],
     img.size[1] + rotated_crop.size[0],
     img.size[1] + cropped_section.size[1]
     ),
    fill = None,
    outline ='white',
    width=340
)

show_qr(img)
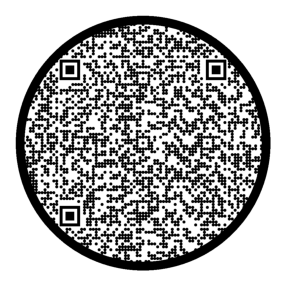
Now it’s looking much better. The pattern we used to fill in the negative spaces is superfluous as a qr reader will ignore it and focus on the qr code square in the center (the original code)
Transparent Background
Inserting this qr code into another image might not be attractive as there’s a lot of white space. A way to combat this would be to save it as a PNG file with an alpha channel that sets the background color to transparent.
The image is currently an RGB image
img.mode

'RGB'
We want to add an alpha channel and make it an RGBA image and set all white pixels to have an alpha value of 0 (transparent) and all black pixels a value of 255 (opaque).
img = img.convert("RGBA")
opaque_pixel = (0, 0, 0, 255)
transparent_pixel = (255, 255, 255, 0)

# invert colors and set alpha color
img_data = img.getdata()
new_pixels = []
for item in img_data:
    if item[0] == 255 and item[1] == 255 and item[2] == 255:  # if white pixel
        new_pixels.append(transparent_pixel)
    else:
        new_pixels.append(opaque_pixel)
img.putdata(new_pixels)
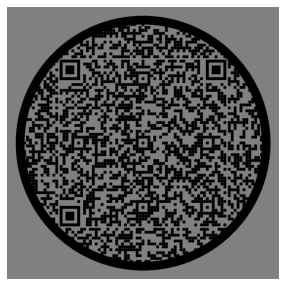
Let’s take a look at it! We’ll add a custom background to show that it is indeed transparent.
background_img = Image.new("RGBA", img.size)

# create rectangle image
background_draw = ImageDraw.Draw(background_img)
background_draw.rectangle(
    (0, 0, background_img.size[0], background_img.size[1]),
    fill="grey",
    outline=None
)

# put the qr code ontop of the background
background_img.paste(
    img,
    (0,0),
    img
)
show_qr(background_img)
Saving the QR Code
img.save('circl_qr_code.png', "PNG", quality=100)